Download a step-by-step guide for configuring SSL on AlmaLinux.
Installing an SSL Certificate on AlmaLinux
You will learn how to install a valid SSL Certificate on an AlmaLinux server running the Nginx web server. You will be using Let’s Encrypt to obtain a certificate for your domain. Let’s Encrypt is a non-profit Certificate Authority (CA) that issues SSL certificates for free.
Background and Prerequisites
This tutorial assumes you are using an AlmaLinux system on the public Internet with a valid DNS A or CNAME record. An A record simply maps a domain name to the IP address of the device hosting that domain. A CNAME, which stands for Canonical Name, is an alias for another domain.
In order to install an SSL certificate, you must have a Web Server installed on your system. In this tutorial, you will install Nginx as your Web Server.
NOTE: This tutorial demonstrates the installation of an SSL certificate for the demo.linuxtrainingacademy.com domain. Even though this domain will be used throughout this tutorial, you must use your own domain when following along.
Connect to the Server as Root
Many of the commands you will be executing will require root privileges. Connect to your Linux server as the root user. If you log with another account, switch to the root account. You can switch to the root account with the “su” command:
su - Install and Configure the Nginx Web Server
Install the Nginx Web Server:
dnf install -y nginxNext, you need to replace a line in the /etc/nginx/nginx.conf file. Open it with your favorite editor.
nano /etc/nginx/nginx.conf(NOTE: You can install “nano” with the “dnf install -y nano” command.)
Find the line that reads:
server_name _;Change “_” to your domain name. Make sure to include the semicolon (;) after your domain at the end of the line:
server_name demo.linuxtrainingacademy.com;Check for any syntax errors or typing mistakes with this command:
nginx -tIf you get a message such as “test failed”, fix your edits in the /etc/nginx/nginx.conf file and try again.
You want to ensure that the web server starts on boot, so you need to enable it. Also, you will want to start it now, so you can use the following command to achieve both of those steps.
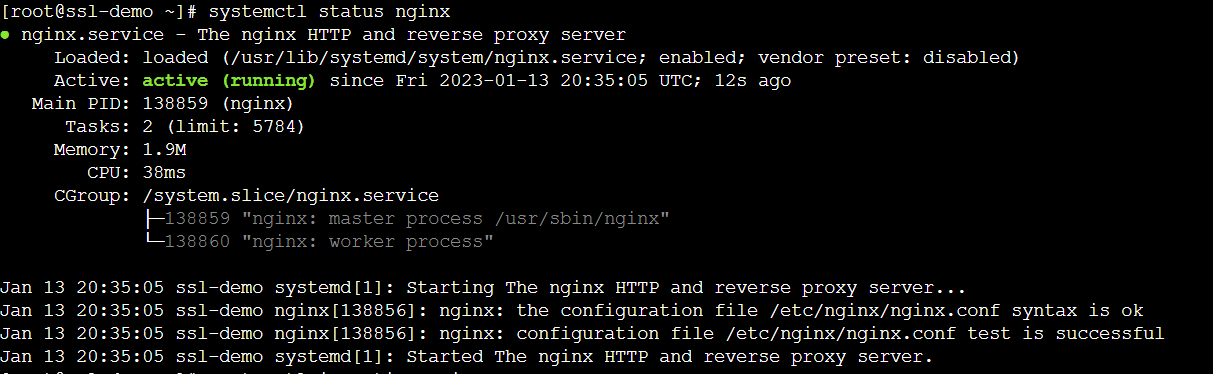
systemctl enable --now nginxYou can verify the web server started by checking its status.
systemctl status nginxIf Nginx is running properly, you will see something like this:
You can also use the “is-active” option to “systemctl” to see if it is running.
systemctl is-active nginxAllow Inbound HTTP and HTTPS Traffic
If you are using the local Linux firewall, run the following commands to allow HTTP and HTTPS traffic:
firewall-cmd --permanent --zone=public --add-service=http
firewall-cmd --permanent --zone=public --add-service=https
firewall-cmd --reload
Test the Web Server
Open up a web browser and connect to your domain name. In this example, I am using http://demo.linuxtrainingacademy.com, but use your domain.
At this point, you should see a test page.

Install snapd
Snapd is not available in the default repository, so we need to add the EPEL repository with the following command:
dnf install -y epel-releaseNow you can install the “snapd” package:
dnf install -y snapdNext, enable the “systemd” unit that manages the main snap communication socket:
systemctl enable --now snapd.socketNow, enable classic snap support:
ln -s /var/lib/snapd/snap /snapInstall the Certbot Application
Use snap to install certbot:
snap install --classic certbotWhen you run certbot, it will configure nginx for HTTPS traffic, tell nginx to use the newly generated cert for that traffic, and set up the auto-renewal of your certificate.`
/snap/bin/certbot --nginx(NOTE: The certbot tool will not be in your $PATH unless you log out and log back in again. This is why we are using the absolute path of /snap/bin/certbot to run it.)
During the installation, enter your email address when prompted. Also, answer “yes” to the questions by pressing “y” when prompted.
Auto Renew Your SSL Certificate
You can test the auto-renewal functionality of your SSL certificate by running this command:
/snap/bin/certbot renew --dry-runIf the automatic renewal works, you will get a response such as: “Congratulations, all simulated renewals succeeded.”
Verify the SSL Certificate
Open up a web browser and connect to your domain over HTTPS. If the certificate installation was successful, you will not receive any errors or warnings about the SSL certificate from your web browser.
You can also check the web server from the command line using the curl utility:
curl https://demo.linuxtrainingacademy.comIf the certificate is valid, curl will return the contents of the website without any errors or warnings.
Congratulations!
At this point, you should have a valid SSL certificate that will be automatically renewed!