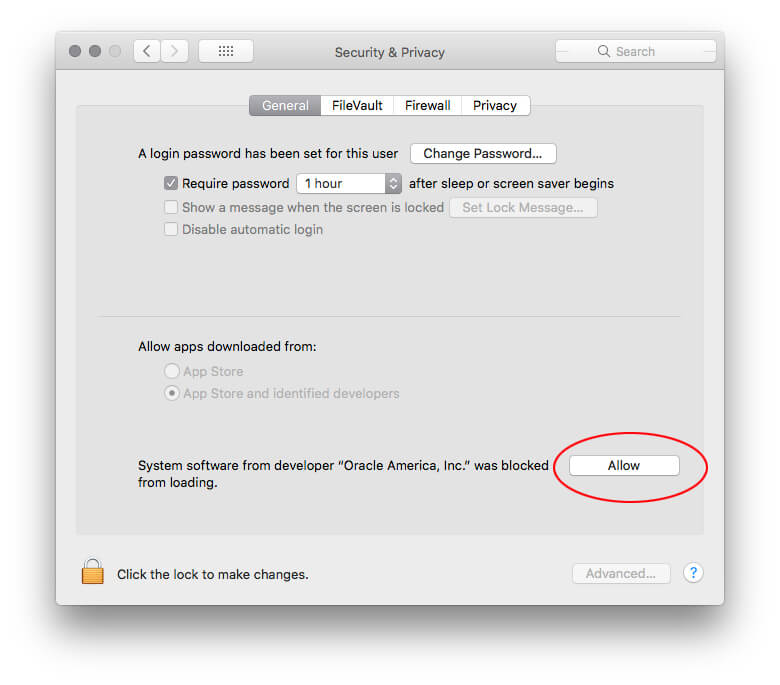
Kernel Driver Not Installed (rc=-19008) (For Mac Users)
Go to System Preferences / Security & Privacy and Click “Allow” in the window below:
This kernel requires an x86-64 CPU, but only detected an i686 CPU.
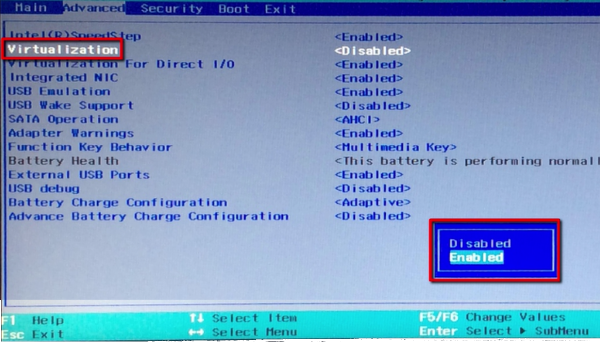
Enable Virtualization Extensions
Make sure you have VT-x (for Intel processors) or AMD-v (for AMD processors) enabled in your physical computer’s BIOS. If you see any settings for “Virtualization Technology,” or “Virtualization Extensions,” enable them. This process varies from manufacturer to manufacturer, so you might have to look up the documentation for your specific computer.
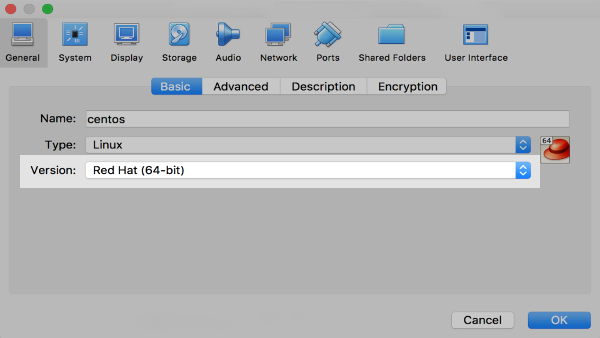
Use a 64-bit Virtual Processor
After you have confirmed the virtualization options for your CPU are enabled, open up the settings for your virtual machine. Click on General and then in the Basic settings tab make sure you’ve selected a 64-bit version. Linux is complaining about the virtual CPU, not your actual CPU. (Unless you really are using a 32-bit physical CPU.)
Use a 32-Bit Version of CentOS
If you’re BIOS does not have the virtualization options, the use a 32-bit version of CentOS. You can download the CentOS 7 32-bit ISO here.
NOTE: There are no 32- bit versions of CentOS 8.
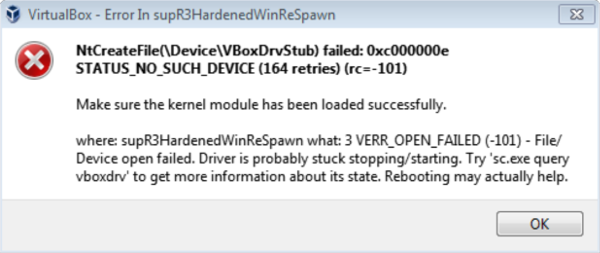
E_FAIL (0x80004005)
Disable or Change the Antivirus Software
If you see an error such as “E_FAIL (0x80004005),” “VERR_OPEN_FAILED,” “NtCreateFile(\Device\VBoxDrvStub) failed,” or “Error in supR3HardenedWinReSpawm,” then there is most likely a conflict between the antivirus software and VirtualBox. Avira, AVG, and other antivirus software have been known to interfere with the operation of VirtualBox. Try disabling your antivirus software. This typically requires a reboot. If VirtualBox works as expected, then you’ll need to keep your antivirus disabled, update it to a later version if the issue is corrected, or even change antivirus software altogether.
This kernel requires the following features not present on the cpu : pae
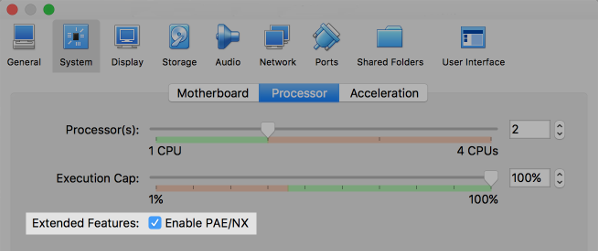
Enable PAE/NX
Open up the settings for your virtual machine. Click on System, then on System, and finally on Processor. (VirtualBoxes Settings -> System -> Processor). Make sure to check the box beside Extended Features: Enable PAE/NX.
When all else fails…
Reboot
When it comes to servers I never reboot as a troubleshooting step. I want to know exactly why something isn’t working, otherwise it might happen again even if a reboot temporarily “fixes” the issue. With desktop operating systems such as Windows or Mac, I’m much more lenient. Sometimes a reboot will actually resolve a VirtualBox issue. Perhaps an update was applied that needs a reboot or some other issue that isn’t immediately obvious. It’s a fairly quick and easy troubleshooting step to try.
Look at the log file.
If you’ve performed all the previous troubleshooting steps but you still have an issue, look at the VBox.log file. It resides in the virtual machine’s folder. It will be something like $HOME/VirtualBox VMs/{machinename}/Logs for Windows systems or $HOME/VirtualBox VMs/{machinename}/Logs for Mac or Linux systems.
Windows Example:
C:\Users\jason\VirtualBox VMs\centos\Logs\VBox.log
Mac Example:
/Users/jason/VirtualBox VMs/centos/Logs/VBox.log
Linux Example:
/home/jason/VirtualBox VMs/centos/Logs/VBox.log